If you’ve read our Binoculars 101 blog, you might recall that the goal in sport optics is simple: get the brightest, sharpest view possible—while sticking to your budget, of course. With spotting scopes available at price points ranging from $350 to $7,500, knowing where to start can feel a bit daunting.
The best way to choose your first, next, or even last spotting scope is to visit a store that specializes in optics. Don’t have one nearby? No problem! A quick phone call or email exchange with a knowledgeable shop can work wonders. The insight you gain in an hour-long visit, a 30-minute call, or even a few emails can save you days of online research.
The Basics
Parts
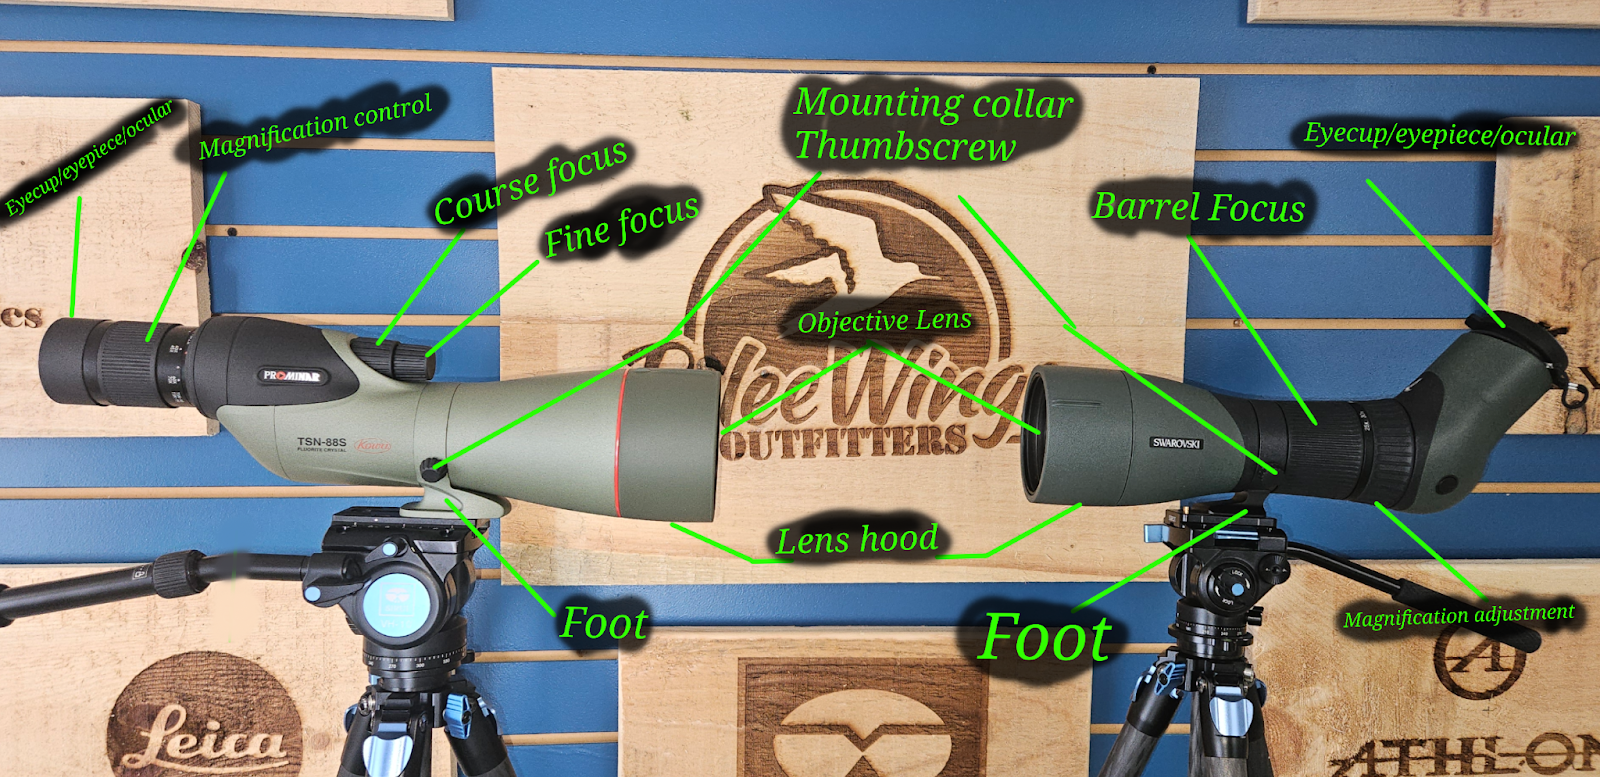
There are several key parts to a spotting scope. Let’s start at the front (the objective end) and work our way back to the eyecup.
Objective Lens – This is the front lens of the scope, where the light enters. The bigger the objective lens, the brighter your view. But, as with most things, there’s a tradeoff—bigger lenses mean a heavier scope!
Lens Hood – This often retractable hood is great for certain lighting conditions or when it’s raining or snowing. If you’re getting glare from the sun or water/snow accumulating on the objective lens, extending the lens hood will help keep your view crystal clear.
Scope Body – The body of the scope houses the lenses, prisms, and focusing mechanism. In lower-priced models, the frame is typically made of plastic. While this keeps costs down, it doesn’t offer as much protection if you drop the scope. As the price increases, you’ll find metal or lightweight alloy frames, which provide better durability and are common in premium models.
Foot – This is the part of the scope that features the tripod attachment point. Some scopes have an Arca Swiss profile and will fit directly into a tripod with an Arca Swiss style head. Others will need to be threaded onto the tripod head or quick shoe, depending on your tripod.
Mounting Collar Thumbscrew – Found on many angled scopes, loosening this will allow you to rotate the scope body, so the eyepiece points either to the side or downward. This is super handy if you’re using your scope on a car window mount or if you have young kids looking through it.
Focus Controls – These come in two styles: barrel or helical focus (shown on the right scope) and dual-rate focus (shown on the left scope). Both have pros and cons. The dual-rate focus makes it easier to fine-tune the focus, but it sticks out from the scope body, making it more susceptible to damage if the scope is knocked over. It’s also harder to use while wearing bulky gloves in the winter. The barrel or helical focus, while a bit harder to fine-tune, is easier to use with gloves and less likely to get damaged.
Magnification Adjustment – This is usually a ring on the eyepiece of your scope, but with some modular series (like Swarovski), the magnification adjustment ring is on the body of the scope. If your scope has a fixed eyepiece (often with a wide angle or long eye relief), there won’t be any magnification adjustment at all. With a variable magnification scope, you simply twist one way to zoom in and the other way to zoom out.
Ocular Lens (Eyepiece) – This is the lens closest to your eyes when you're looking through the spotting scope.
Eyecups – Most scopes come with adjustable eyecups. Users who don’t wear glasses typically find the best view with the eyecups fully extended. Those who wear glasses usually get the best view when the eyecups are fully retracted (in the shortest position).
Spotting scopes usually have a series of numbers printed on them, typically found on the eyepiece. These numbers indicate the magnification range, such as 20x-60x or 17x-40x. The first number tells you the magnification at the lowest zoom, while the second number shows the magnification at the highest zoom. For example, a 20x-60x scope will make your subject appear 20x closer at the lowest zoom and 60x closer at maximum zoom. Sometimes, you’ll also see a second number printed on the body of the scope, representing the diameter of the objective lens (the front lens). Let’s dive deeper into what these numbers mean and how they’ll affect your experience.
Magnification
Many customers come in asking for the highest magnification possible. While this seems logical, higher magnification often comes with more drawbacks than benefits.
Increased Shake
Higher magnification doesn’t just make your subject look closer—it also magnifies any movement. Vibrations from wind, footsteps on a boardwalk, or even adjusting the scope can become more noticeable. For this reason, a tripod is essential for spotting scopes.
Narrower Field of View
As magnification increases, the field of view (the "window" you’re looking through) decreases. This makes it harder to locate and track your subject, especially if it’s moving.
Diminished Brightness
Magnification affects something called the exit pupil—the small circle of light you see when looking into the eyepiece. As you zoom in, the exit pupil gets smaller, restricting the amount of light exiting the scope. Less light means a darker and grainier view, especially in low-light conditions.
Pro Tip
Most users find that as they approach the upper end of their spotting scope's magnification range, the view becomes noticeably dimmer and less sharp. Because of this, many people rarely use the maximum magnification. Don’t get too hung up on having the highest available power—it’s more about finding a scope with high-quality optics that perform well across the entire magnification range.
Objective Diameter
This one’s pretty straightforward: the larger the objective lens, the more light it gathers. More light equals a brighter image. Mathematically, every 10% increase in objective lens diameter results in about a 75% increase in light-gathering ability. For instance, an 85mm scope collects roughly 230% more light than a 65mm scope. If bigger is brighter, why doesn’t everyone use massive spotting scopes with 100mm or larger lenses? The answer is weight. While a 95mm or 115mm scope might be fine for short walks from your car to a pier, most people don’t want to haul one on longer hikes. A balance between brightness and portability is key, and 65mm or 85mm scopes often hit the sweet spot.
Resolution
Resolution, or the amount of detail you can see, relies heavily on light. Think of standing in a dimly lit room trying to read the label on a box across the room—it’s tough. Flip on a light, and suddenly the print is clear. Two factors determine how much light reaches your eye:
- Objective Diameter: As mentioned earlier, larger lenses let in more light, which improves brightness and resolution.
- Glass Quality and Coatings: Not all the light entering a scope makes it to your eye. The quality of the glass and its coatings determines the percentage of light transmitted. Entry-level scopes typically have light transmission rates in the high 70% to low 80% range, while top-tier optics can achieve rates in the high 80% to mid-90% range.
Choosing the right spotting scope doesn’t have to be intimidating. By understanding magnification, objective diameter, and resolution—and seeking advice from a knowledgeable source—you’ll be well-equipped to find a scope that fits your needs and budget. (Ready to buy? Read our Spotting Scope Buyer's Guide). Happy spotting!